Task 4: Add a GitHub Actions Workflow for Validation and Packaging
Introduction
The lab is designed to run completely on a local machine, but it also demonstrates how the same GitOps workflow can run in a hosted CI/CD system. In this task, you will create the first version of the GitHub Actions workflow so the repository can validate changes and build the deployment artifact automatically.
Goal
Create a GitHub Actions workflow that validates repository changes and packages the lab artifact.
Task Dependencies
Complete Task 3 before starting this task.
Diagram
flowchart LR
    A[Push to main] --> B[GitHub Actions validate job]
    B --> C[GitHub Actions package job]
    C --> D[Artifact uploaded]
Steps
Step 1: Create the workflow file
Create .github/workflows/gitops-pipeline.yml:
touch .github/workflows/gitops-pipeline.yml
PowerShell:
wsl touch.github/workflows/gitops-pipeline.yml
This creates the file that GitHub Actions reads when changes are pushed to the repository. Keeping the workflow under .github/workflows/ allows GitHub to recognize it automatically as part of the automation pipeline.

Step 2: Add the workflow name
Add the following content to .github/workflows/gitops-pipeline.yml:
name: GitOps Network Pipeline
The name field gives the workflow a readable title in the GitHub Actions interface. When the workflow runs, this is the label learners will see in the Actions tab.
Save .github/workflows/gitops-pipeline.yml after adding the workflow name. This keeps the file up to date as you continue building the YAML in the following steps.
Step 3: Start the trigger section
Add the trigger container under the workflow name:
on:
The on section defines what events cause the workflow to run. Every trigger you add beneath it becomes another way to start the pipeline.
Step 4: Add the push trigger
Add the automatic trigger for changes to the main branch:
on:
  push:
    branches:
      - main
This tells GitHub Actions to run the workflow whenever a change is pushed to main. That matches the primary GitOps path in the lab, where committed repository changes drive automation.
Step 5: Add the manual trigger
Add the manual run option:
on:
  push:
    branches:
      - main
  workflow_dispatch:
This adds a manual run button in GitHub Actions. It is useful when you want to rerun the pipeline without making another commit.
Step 6: Review the pipeline file with trigger
At this point, the pipeline file should look like this:
name: GitOps Network Pipeline

on:
  push:
    branches:
      - main
  workflow_dispatch:
Seeing the full pipeline file thus far makes it easier to understand how the workflow can start either automatically from a push or manually from the GitHub interface.
Step 7: Start the jobs section
Add the jobs container on a new line:
jobs:
The jobs section is where the work of the pipeline is defined. Each job represents a stage in the hosted workflow, similar to how your local scripts represent stages in the local workflow.
Step 8: Add the validation job header
Add the beginning of the validation job:
jobs:
  validate:
    runs-on: ubuntu-latest
This creates a job named validate and tells GitHub to run it on a Linux runner. The name of the job becomes part of the pipeline view, which makes it easier to understand the flow from validation to packaging.
Step 9: Start the validation job steps section
Add the steps container under the validation job:
jobs:
  validate:
    runs-on: ubuntu-latest
    steps:
This marks the beginning of the ordered actions the runner will perform during validation.
Step 10: Add the validation checkout step
Add the first validation step:
jobs:
  validate:
    runs-on: ubuntu-latest
    steps:
      - name: Check out repository
        uses: actions/checkout@v4
This step copies the repository contents into the runner so the workflow can access the same files you used locally.
The - starts a new item in the steps list. Each item is one action or command that GitHub Actions runs in order. The name field gives the step a readable label in the Actions log. The uses field tells GitHub Actions to run a reusable action.
An action is a packaged piece of automation that can be reused across workflows. Actions can come from the same repository, another public repository, or the GitHub Marketplace. In this case, actions/checkout@v4 refers to version 4 of GitHub's official checkout action from the actions/checkout repository. It downloads the repository code onto the runner so later steps can read files and run scripts from the project.
Step 11: Add the validation script step
Add the step that runs the validation script:
    steps:
      - name: Check out repository
        uses: actions/checkout@v4
      - name: Run validation script
        run: ./scripts/validate_configs.sh
This step runs the same script from Task 3, which keeps the hosted pipeline aligned with the local workflow instead of introducing separate validation logic.
The run field tells GitHub Actions to execute a shell command on the runner. In this case, the command is ./scripts/validate_configs.sh, so the runner starts the validation script from the repository after the checkout step has copied the files into place. If the script exits with an error, the step fails and the validation job stops.
Step 12: Review the complete validation job
At this point, the validation job should look like this:
jobs:
  validate:
    runs-on: ubuntu-latest
    steps:
      - name: Check out repository
        uses: actions/checkout@v4
      - name: Run validation script
        run: ./scripts/validate_configs.sh
Reading the full validation job together helps show how the runner is prepared and how the local validation logic becomes part of the hosted pipeline.
Step 13: Add the packaging job header
Add the beginning of the packaging job at the same level as validate:
jobs:
  validate:
    ...
  package:
    needs: validate
    runs-on: ubuntu-latest
This creates a second job named package. The needs: validate line means packaging will only run if validation succeeds. That dependency is important because it prevents invalid configurations from moving further through the pipeline.
Step 14: Start the packaging job steps section
Add the steps container under the packaging job:
    package:
        needs: validate
        runs-on: ubuntu-latest
        steps:
This begins the sequence of actions that will build and publish the deployment artifact.
Step 15: Add the packaging checkout step
Add the first packaging step:
    package:
        needs: validate
        runs-on: ubuntu-latest
        steps:
          - name: Check out repository
            uses: actions/checkout@v4
This step checks out the repository again because each GitHub Actions job runs in its own fresh environment.
Step 16: Add the package creation step
Add the step that builds the lab artifact:
    steps:
      - name: Check out repository
        uses: actions/checkout@v4
      - name: Create package artifact
        run: ./scripts/package_artifacts.sh
This step creates the same packaged bundle you built locally, which keeps the hosted pipeline consistent with the local workflow.
Step 17: Add the artifact upload step
Add the step that stores the package for later jobs:
      - name: Upload package artifact
        uses: actions/upload-artifact@v4
        with:
          name: network-configs
          path: artifacts/configs.tar.gz
This step saves the packaged bundle inside GitHub Actions so it can be reused by a later deployment stage.
The with block provides inputs to the actions/upload-artifact action. The name value, network-configs, is the label GitHub Actions will use for the uploaded artifact. The path value points to the file that should be uploaded from the runner workspace, which is the artifacts/configs.tar.gz package created by the previous step.
Step 18: Review the complete packaging job
At this point, the packaging job should look like this:
  package:
    needs: validate
    runs-on: ubuntu-latest
    steps:
      - name: Check out repository
        uses: actions/checkout@v4
      - name: Create package artifact
        run: ./scripts/package_artifacts.sh
      - name: Upload package artifact
        uses: actions/upload-artifact@v4
        with:
          name: network-configs
          path: artifacts/configs.tar.gz
This full view shows how the package stage depends on validation, rebuilds the deployment artifact, and then stores it for the next stage of the workflow.
Step 19: Review the finished workflow file
At this point, .github/workflows/gitops-pipeline.yml should contain:
name: GitOps Network Pipeline

on:
  push:
    branches:
      - main
  workflow_dispatch:

jobs:
  validate:
    runs-on: ubuntu-latest
    steps:
      - name: Check out repository
        uses: actions/checkout@v4
      - name: Run validation script
        run: ./scripts/validate_configs.sh

  package:
    needs: validate
    runs-on: ubuntu-latest
    steps:
      - name: Check out repository
        uses: actions/checkout@v4
      - name: Create package artifact
        run: ./scripts/package_artifacts.sh
      - name: Upload package artifact
        uses: actions/upload-artifact@v4
        with:
          name: network-configs
          path: artifacts/configs.tar.gz
Reading the full file after building it section by section helps reinforce how the pieces fit together. The workflow now has a clear sequence: trigger, validate, and package.
Step 20: Save the workflow file
Save .github/workflows/gitops-pipeline.yml in Visual Studio Code.
Saving the completed workflow file ensures Git can see the final version before you review, stage, and commit it.
Step 21: Review repository status
Check what Git sees after adding the workflow file:
git status
This confirms that the workflow file has been created and helps you verify the repository state before staging it.
Step 22: Stage the workflow file
Add the workflow definition to the staging area:
git add .github/workflows/gitops-pipeline.yml
This stages the hosted CI change, which keeps the commit focused and easy to understand.
Step 23: Commit the workflow
Create a commit for the new pipeline:
git commit -m "Add GitHub Actions pipeline for validate and package"
This records the point where the repository gains a hosted workflow that validates changes and produces a reusable deployment artifact.
Step 24: Push the workflow to the remote repository
Publish the new workflow:
git push origin main
Pushing sends the workflow file to the remote hosting platform, which allows GitHub Actions to run the pipeline.
Step 25: Navigate to the GitHub repository
Open the gitops-neteng-lab GitHub repository in your browser.
- In the browser, type https://github.com or simple click the hyperlink to open in a new tab.
- Once you are logged in, click on your profile in the top right corner of the webpage.
- From the drop down menu, click
Your Repositories - Click the
gitops-neteng-labGitHub repository
This brings you to the remote copy of the project. In the next step, you will observe the CI Pipeline in GitHub Actions.
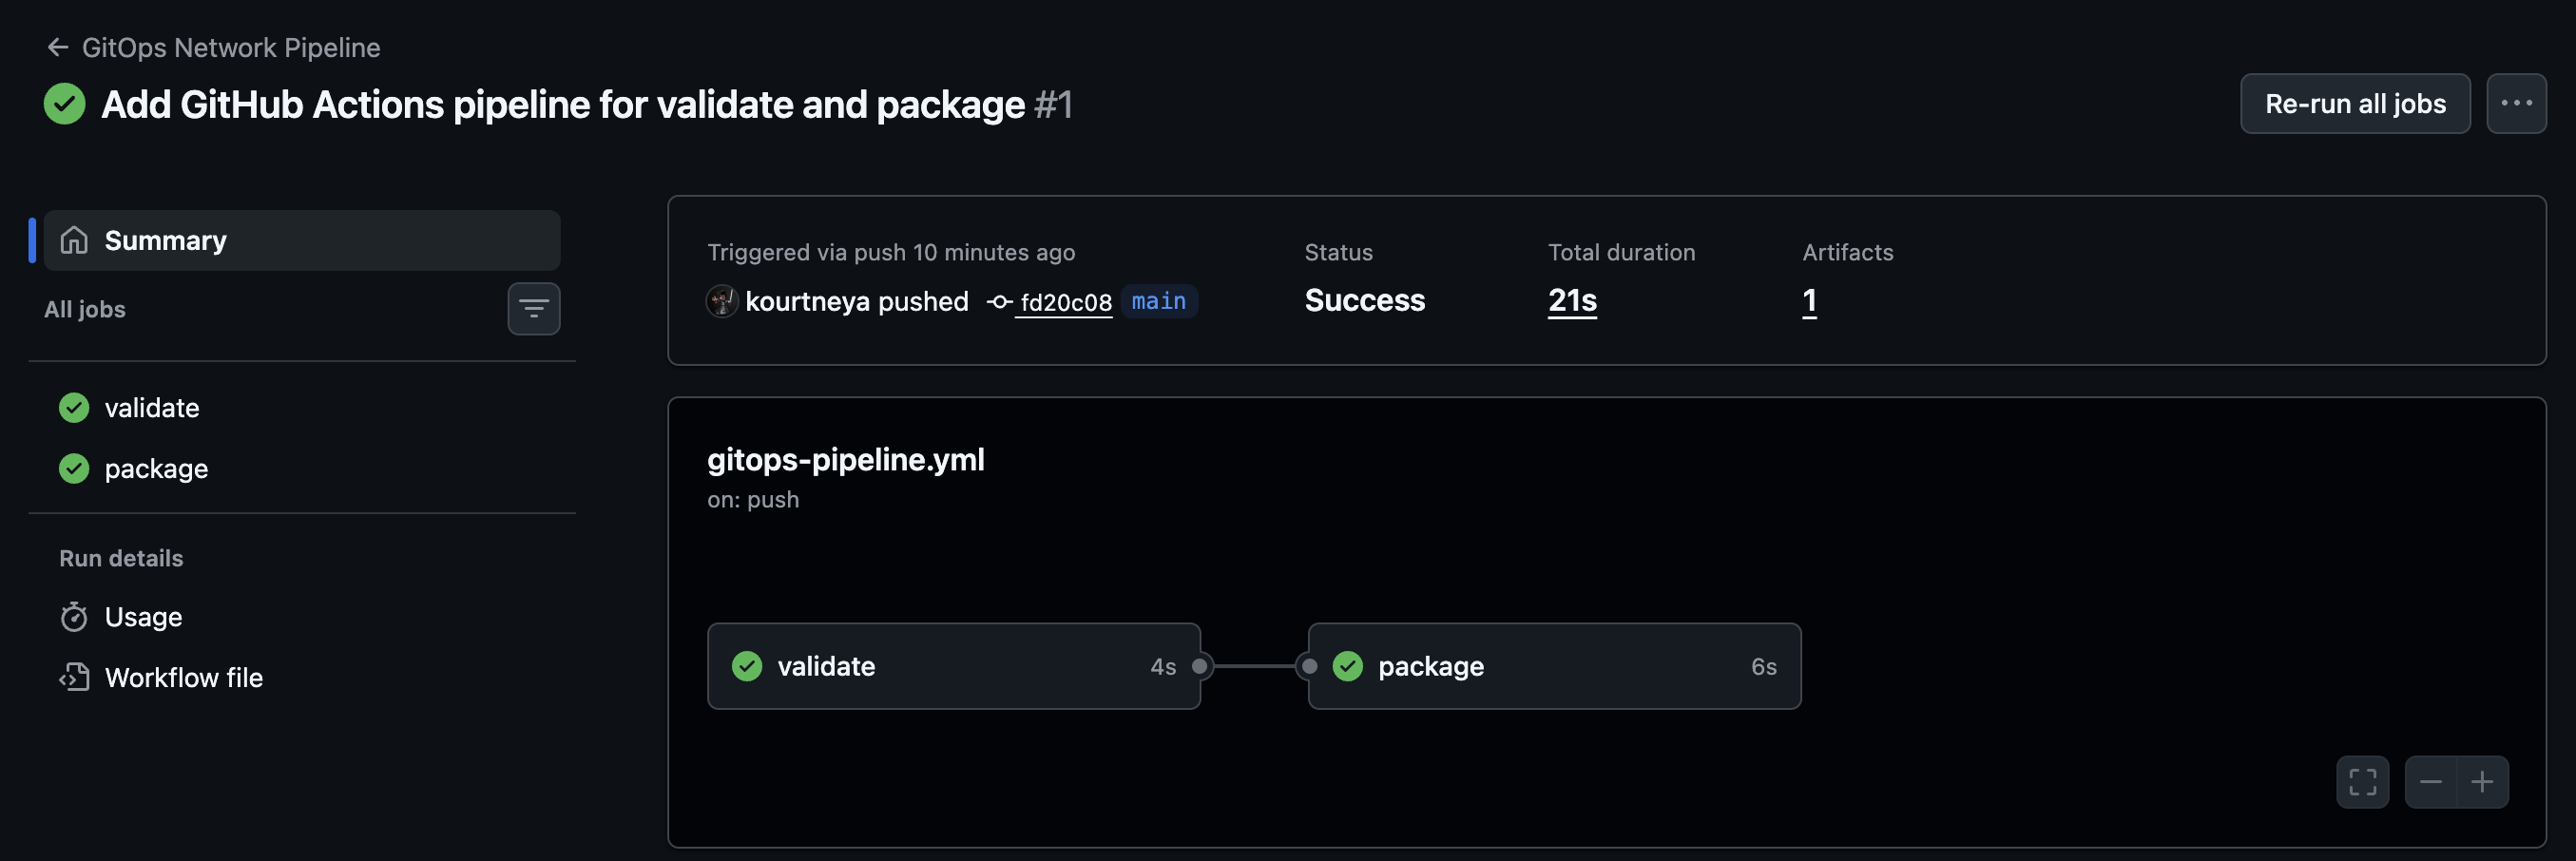
Step 26: Observe the pipeline stages
After the push, review the workflow run in GitHub Actions and confirm that it moves through these stages:
-
Click
Actionsin the top menu,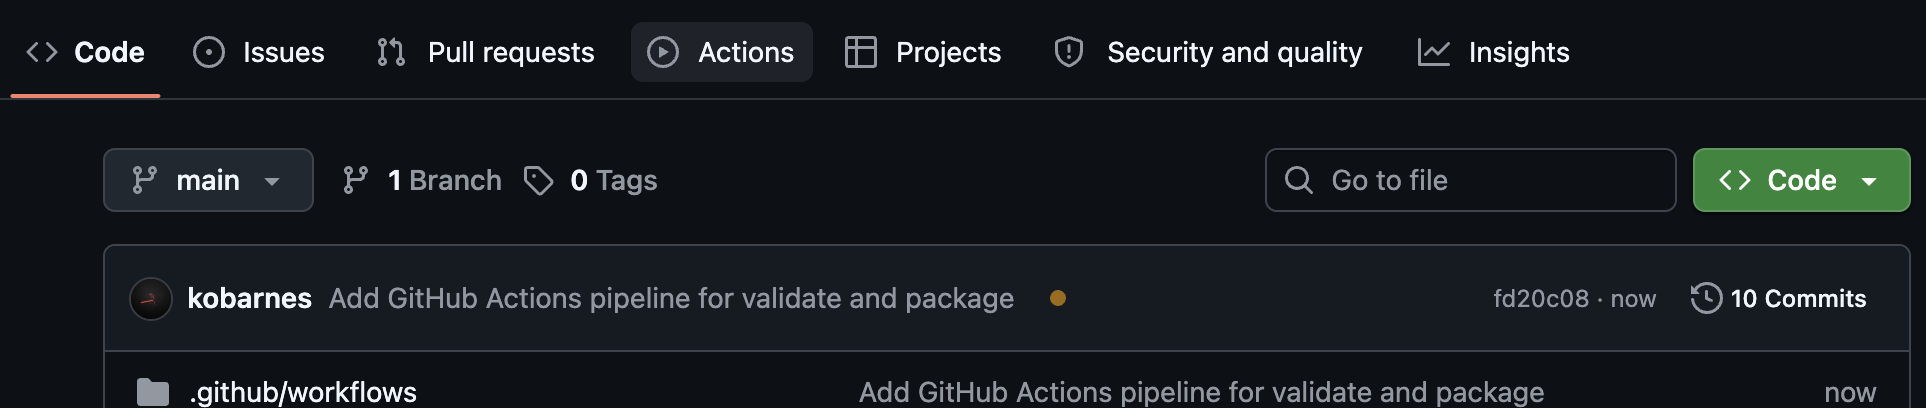
-
Click
Add GitHub Actions pipeline for validate and packageor the title of the commit message used in the previous commit step.
-
Notice the status of the following stages
- Validation
- Packaging
Watching the run progress helps connect the YAML definition to the actual execution flow.
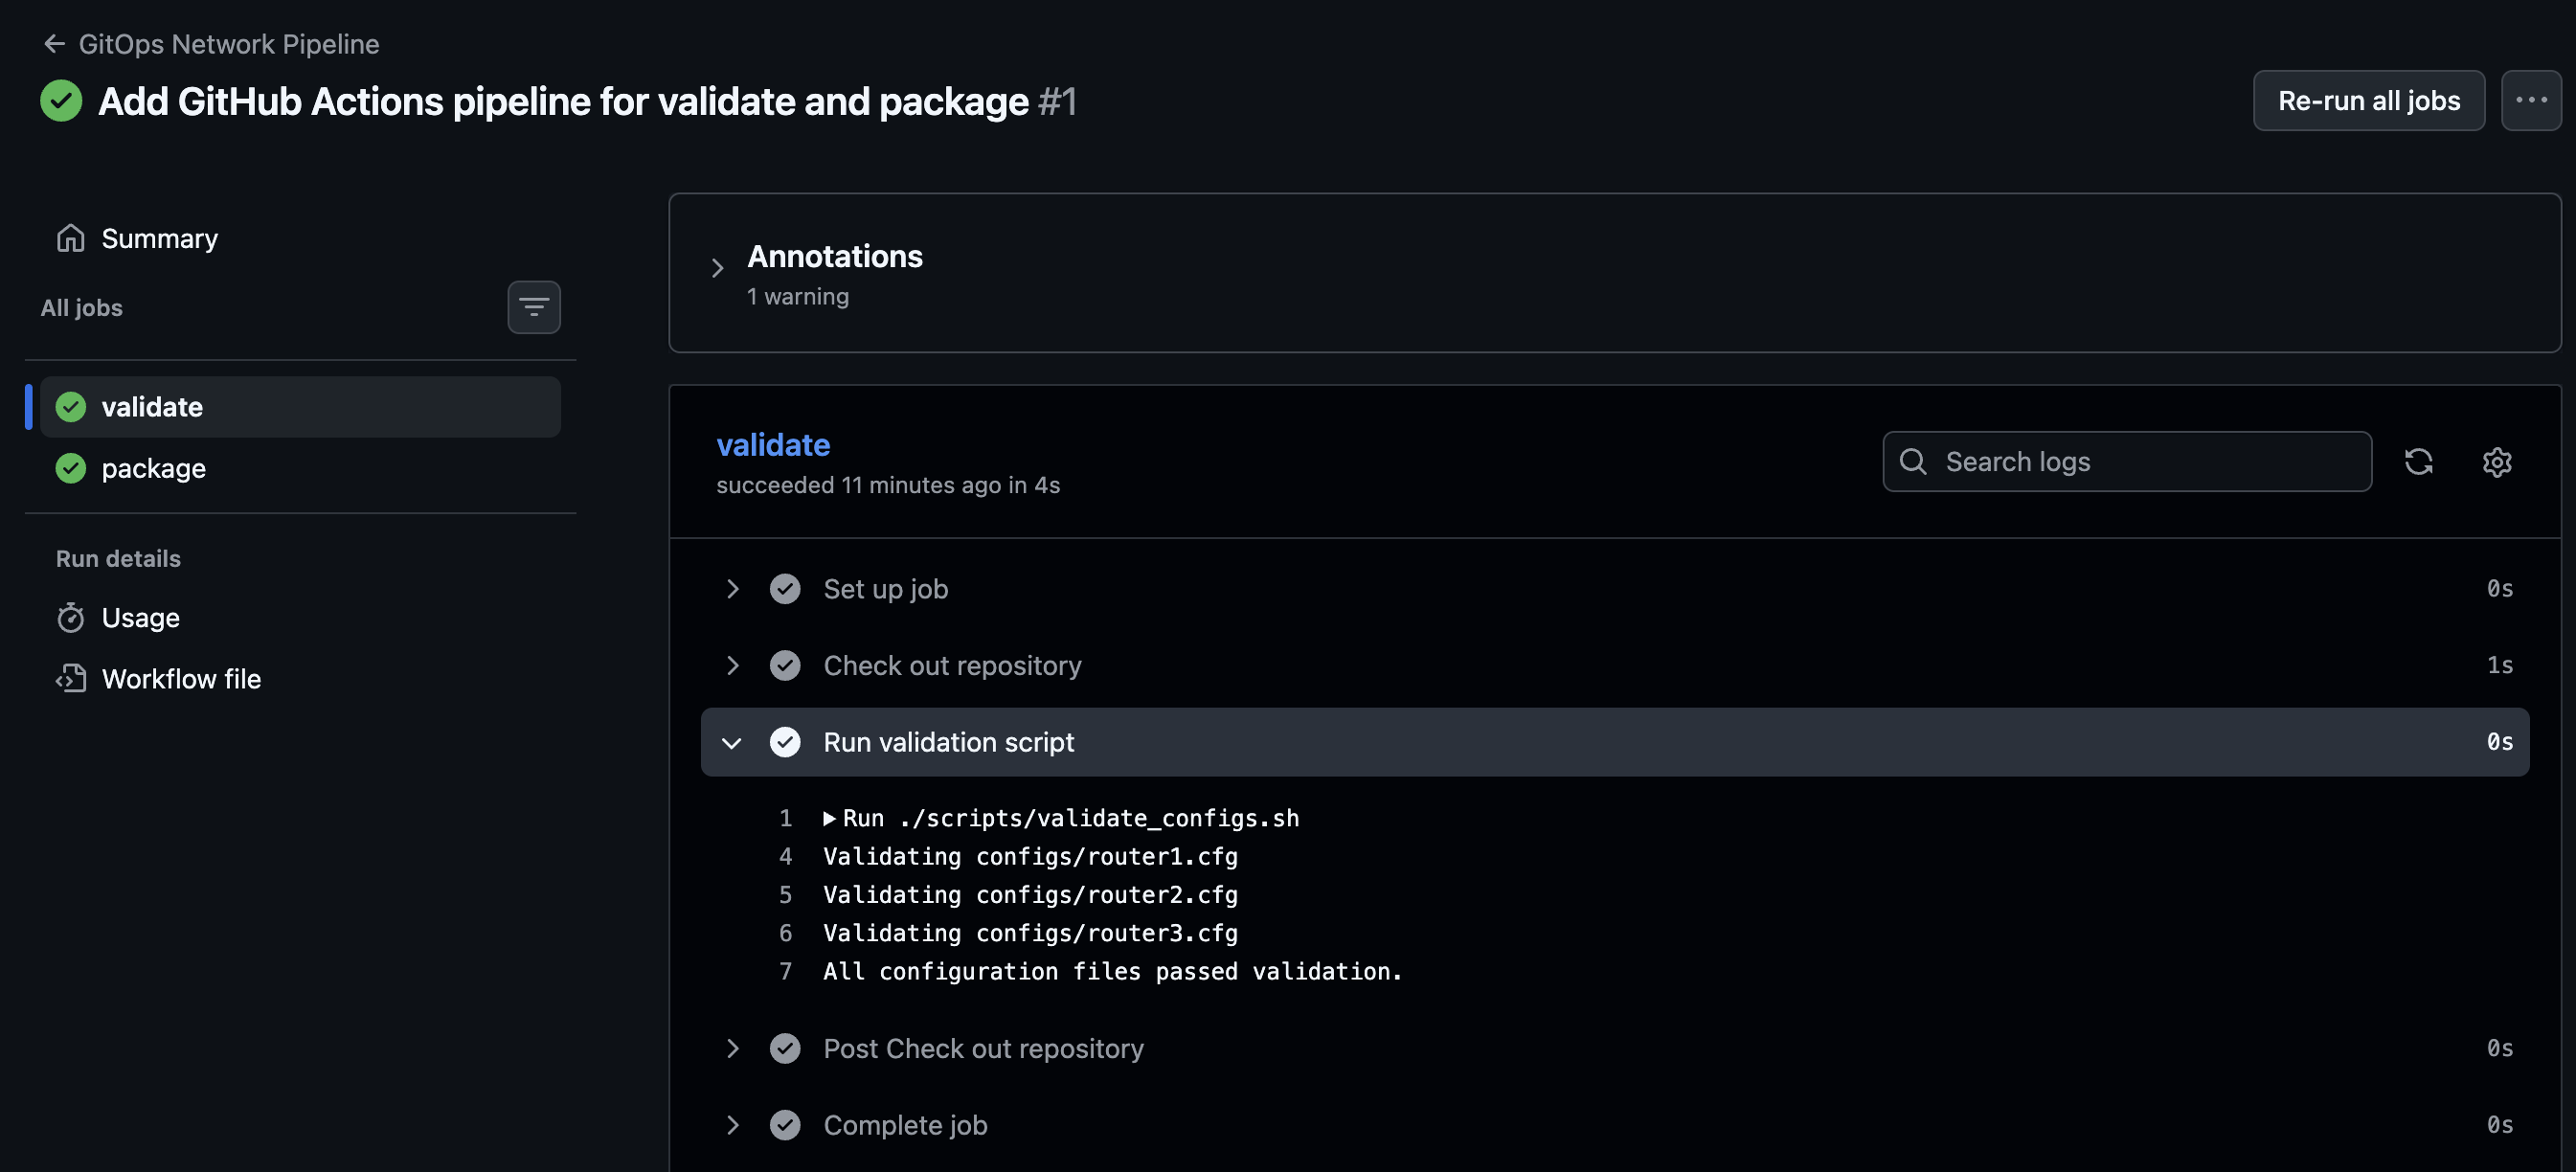
Step 27: Review the validate job
In the workflow run view, click the validate job in the gitops-pipeline.yml diagram.
Expand the job details and review each step:
- Set up job
- Check out repository
- Run validation script
- Post Check out repository
- Complete job
Open the logs for each step so you can see the commands GitHub Actions ran and confirm that the validation script completed successfully.
Note
If the job fails with a Permission denied error, run the following commands
git update-index --chmod=+x scripts/validate_configs.sh
git update-index --chmod=+x scripts/package_artifacts.sh
git commit -m "Add execute permissions to scripts"
git push origin main
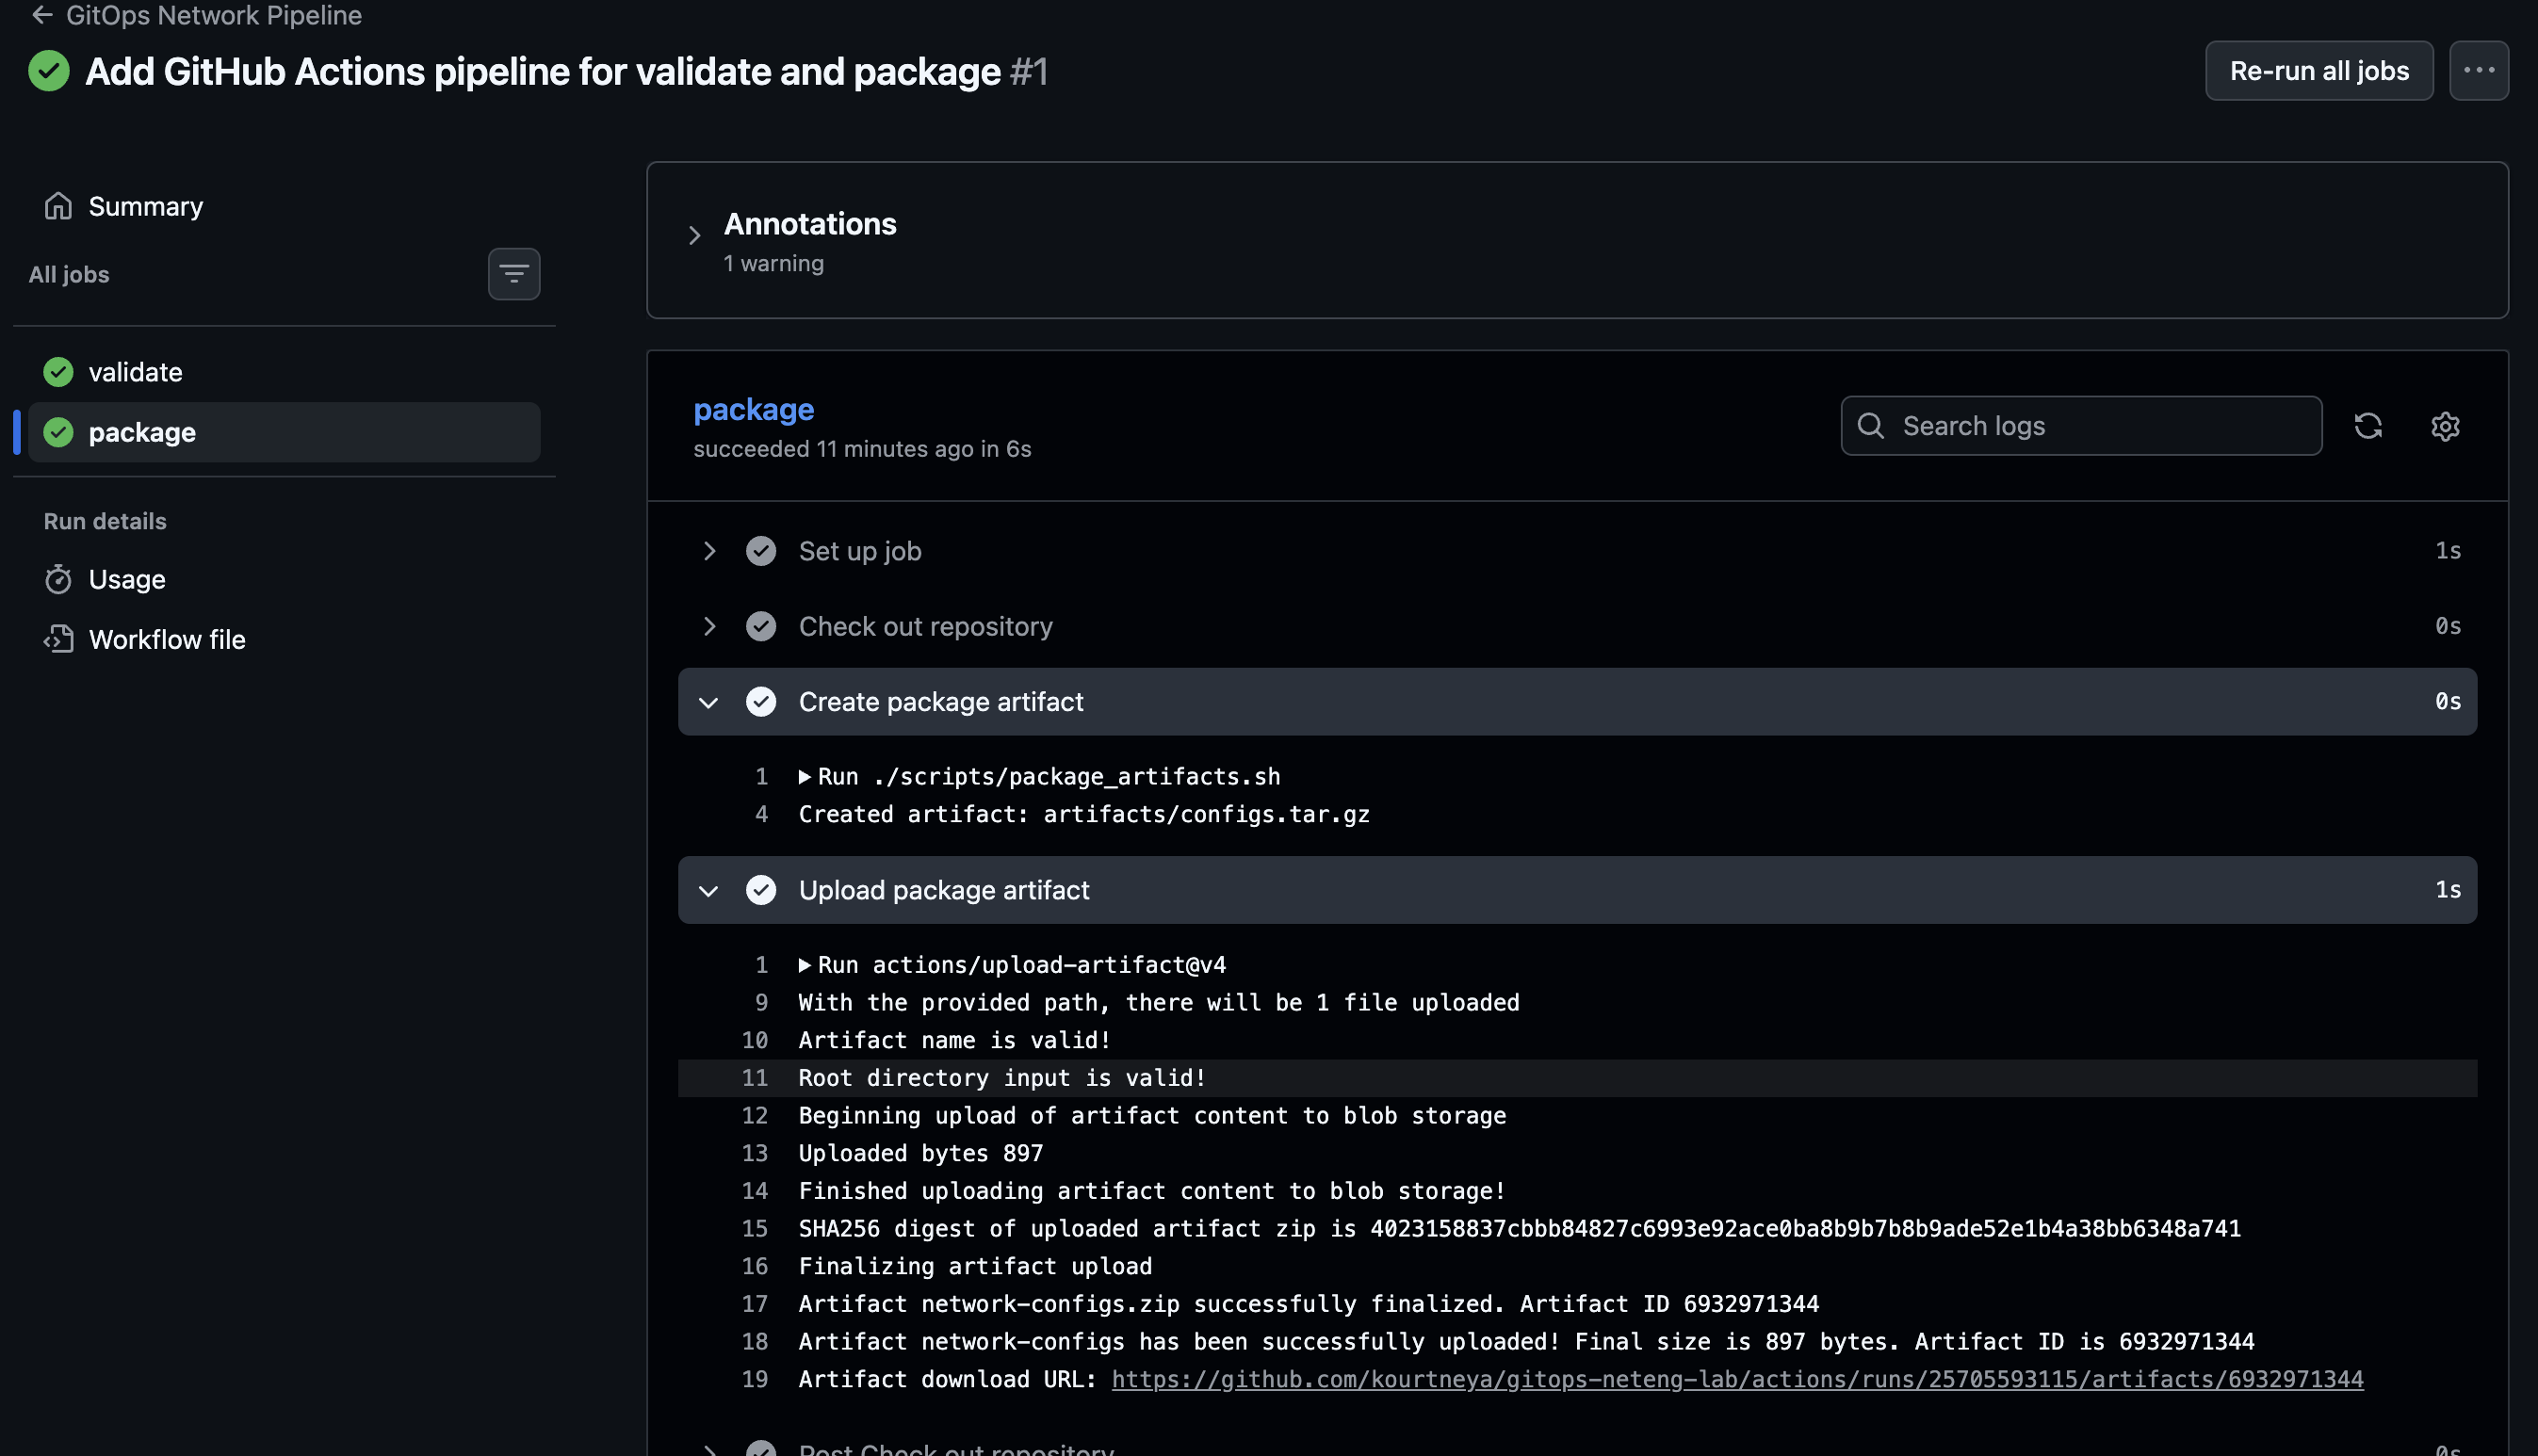
Step 28: Review the package job
Click the package job in the workflow run view.
Expand the job details and review each step:
- Set up job
- Check out repository
- Create package artifact
- Upload package artifact
- Post Check out repository
- Complete job
Open the logs for each step so you can see how the artifact was created and uploaded for later use.
Why This Matters
GitOps works best when the repository can validate and package its intended state automatically. This task establishes the first hosted stage of that workflow and produces the artifact that a later deployment job can use.
Final Summary
You added a hosted CI workflow that validates the repository and packages the deployment artifact. In Task 5, you will start the existing CML lab and extend the workflow with the deployment job that updates the existing topology.